High quality digital and litho printers in Colchester
Wire Stitching Set Up Guide
Middle pages are trimmed shorter
No. of
pages is a multiple
of 4
Add 3mm bleed on all edges
Supply pages in reading order
How do I set up artwork for printing a
wire stitched booklet?
Dont worry, this is all pretty straightforward. Just follow our step by step guide below and your booket will arrive exactly as your brain imagined!
Files for wire stitched booklets are set up in correct reading order.
The first page is your cover, the last page is your back cover, the pages in between are in correct reading order just exactly as though you were flicking through the finished booklet. Simple.
They need to be supplied as single pages NOT spreads. Our system will then sort the single pages into imposed printer's pairs so all you need to worry about is getting the pages in the same order as you want people to read them.
Create a new file
File > New > Document
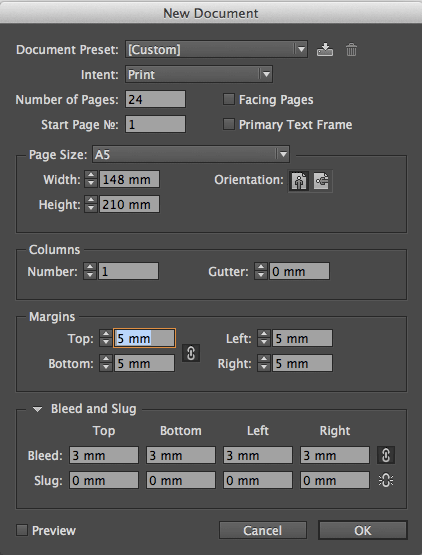
The box that opens contains everything you need to ensure the file is set up correctly.
Our example here on the right
is for a 24 page A5 Portrait booklet.
'Number of Pages'
Says it all on the tin - type in the number of pages you have. Remember this has to be a multiple of four to be wire stitched so you'll be going for 8,12,16,20,24,28,32,36 or 40.
'Facing Pages'
If you find it easier to design as double page spreads then leave this option ticked. If you are comfortable working in single pages then untick this box. Maybe try both ways before starting to see which you prefer.
'Master Text Frame'
Leave unticked
'Page Size'
Make sure the page size you specify is the same size as
you intend your finished booklets to be. We're not mind
readers - if you set your page at A4 but want an A5 booklet
then something's gone wrong. There are some presets here to save you time so if you click a drop down menu appears with some popular sizes to save you having to input the actual dimensions in the boxes below.
Click here for paper size dimensions.
'Orientation'
The left hand icon is portrait and the right hand one is landscape.
'Columns'
Best to leave this on '1' although advanced booklet designers might like to change this to produce a column layout to work with.
'Gutter'
This relates to this distance between your columns. If you only have one column then there is no gutter and you can skip this box.
'Margins'
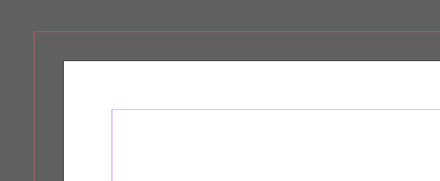
You can set the top, bottom, inside and outside margins to 5mm which will help you avoid placing important information within 5mm of the page edge. The margins
are displayed as pink lines on your InDesign page (see image on the right). If this is confusing then set the margins to '0'.
'Bleed and Slug'
Adding 3mm in the top, bottom, left and right boxes here will add a border on your InDesign artwork 3mm outside of the blank page edge to show where the bleed needs to extend to. The bleed area has a red border on your InDesign page (see right). For further information on bleed see the Bleed
set up section above.
Click 'OK' and your new file will open.
You will now see a page identical to the one on the right. Brilliantly you can now see your back cover on the left, your spine through the centre and your front cover on the right.
Easy!
Wire stitching set up recap
1. Send us one hi res pdf with 3mm bleed on each edge and all images saved as cmyk.
2. Your total number of pages must be a multiple of 4 (8,12,16,20,24,28 etc).
3. Pages should be supplied in correct reading order.
4. Artwork should be the same size you want your printed booklet to be.
5. Pages nearer the centre are trimmed short - keep info away from edges.
We don't just deliver in Colchester
Check out www.exwhyzed.co.uk for
Booklet Printing
Business Card Printing
Leaflet Printing
Poster Printing
Self Published Book Printing
Zine Printing
Contact Us
tel: 01206 766647
email: colchester@exwhyzed.co.uk
web: www.colchesterprinter.com
and www.exwhyzed.co.uk
© Ex Why Zed 2016
All rights reserved. No reproduction without permission -
use some brain cells and write your own content!
Check www.exwhyzed.co.uk for...
Annual Report Printing
Architecture Study Book Printing
Artist Catalogue Printing
Booklet Printing
Business Card Printing
Degree Show Catalogue Printing
Digital Printing
Final Major Project Printing
Leaflet Printing
Newsletter Printing
Portfolio Printing
Poster Printing
Self Published Book Printing
Stationery Printing
Sticker Printing
Zine Printing