High quality digital and litho printers in Colchester
File Set Up Guide
Convert images to cmyk
Hi Res
Images (300dpi)
Add 3mm bleed on all edges
Artwork
same size
as book
Why should I supply my files correctly?
We appreciate your deadline is tight so supplying correct artwork means your job can go straight on the press and be delivered when you need it.
1. Create a new file
File > New > Document
In the box that opens make sure the page size is the same size as you intend your finished print to be. We're not mind readers - if you set your page at A4 but want an A5 booklet either you or us will have to resize the file. We charge a minimum of £25 for this.
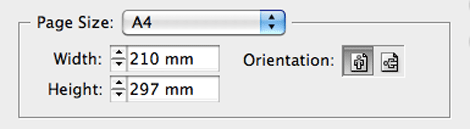
Before you leave this box, remember to add 3mm for bleed. Simply type '3 mm' into the Top, Bottom, Inside and Outside boxes. Now when your new file opens there will be an additional 3mm around the edge of the page. When you start designing, your images and background colour should be extended into this area to make the necessary 3mm bleed. (More on this later, I bet you're excited?!).
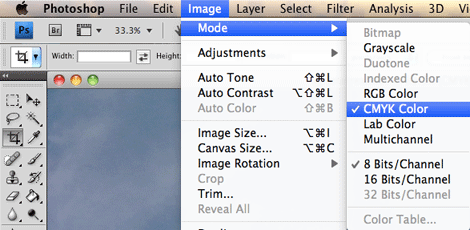
2. Make sure the document
is in cmyk mode
Window > Colour
Check the Colour Menu to confirm or change this. Click the small arrow in the top right hand corner to change setting.
Now all new text and coloured backgrounds created in your page will be assigned a cmyk value.

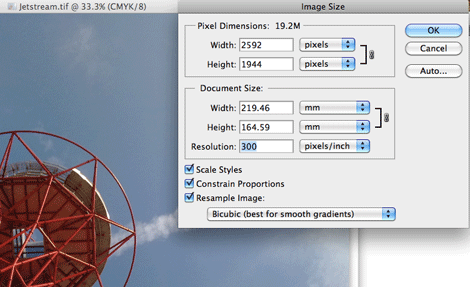
3. All images should be saved at 300dpi.
Open your images in Photoshop.
Image > Image Size > Resolution : Set to "300"
Save in Photoshop at 300dpi and at least the physical size they will be when printed to ensure images are crisp and not pixelated or out of focus. SO, if your image will fill an A4 page when it's printed it should really be at least A4 in it's original form.
There are plenty of websites providing free high-res images.
Try www.sxc.hu for millions of free images.
PLEASE NOTE: If your images are less than 300dpi at the size they will be printed at then it is not possible to improve the quality. You should either make the images smaller in your book or use higher quality versions.
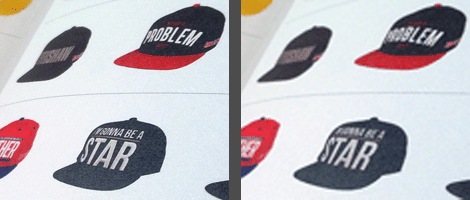
Will it be ok to include lo res images?
You decide, but we recommend you always use hires images if possible.
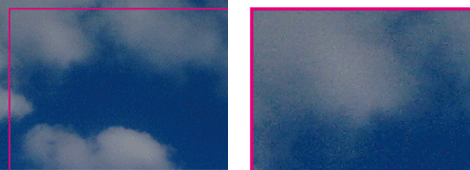
The image on the left here is at 300dpi. The image on the right is only 72dpi. We always preflight every file before going to print and try to advise when you have included lo res images.
4. All images should be saved as CMYK
Again, you can change this in Photoshop.
Image > Mode > CMYK Color
Images will be RGB when you saved them onto your computer from your camera or the internet. Open them in Photoshop or any other photo editing program and
resave as CMYK.
If you are short on time then there is a quick way round this.
When you export your file to Pdf go to the 'Output' tab in the Export to PDF box. Choose 'Convert to Destination (Preserve Numbers)' and in the Destination box select 'Document CMYK - Coated FOGRA39'. This will convert your whole file to cmyk! If you've got hundreds of images this will save you hours compared to converting them all in Photoshop.
Once images are saved as 300dpi and CMYK you can go ahead and use them in InDesign.
The InDesign Links Menu is a handy and quick way of checking the set up of any images in your artwork.
Window > Links
Notice on the Links Menu (right) our images are 300ppi but their Effective ppi is 475 which means they are being used smaller than the physical size of the image so the quality is even better.
If you are concerned about how some images or colours in your artwork will print then we can run a hard copy proof for a final check. This will add an extra 3 or 4 days to the turnaround so be sure to leave enough time.

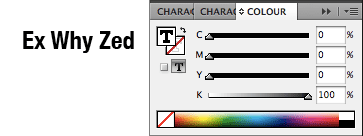
5. When typing any black text always set it as C0 M0 Y0 K100 on the CMYK slider.
This means only one ink colour goes into printing your text. If you make text out of a four colour black the press has to align four colours to make the black text rather than just printing black which will be crisp and in focus.
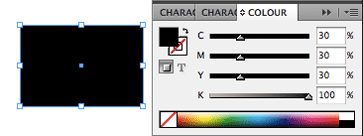
6. However for background boxes if you want a nice, rich black then we suggest setting them as 30/30/30/100.
By adding 30% cyan, magenta and yellow behind your 100% black this will make the black more punchy. Although 0/0/0/100 is great for text is makes the black look flat on larger areas.
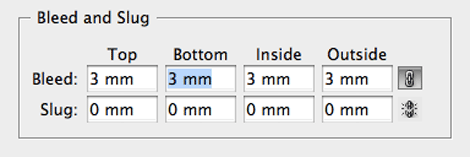
7. All files need 3mm bleed on each edge.
‘Bleed’ is the technical term for the area around your
artwork. If you want your images to go right upto the edge of your printed pages then you need to add an extra 3mm on all four edges of your artwork. Without bleed you will be left with an unwanted white border where the image stops.
When designing your file, simply extend any images or background colour beyond the page edge (the pink line) by 3mm like the examples here (There is bleed on the left hand example but not on the right.). Easy!
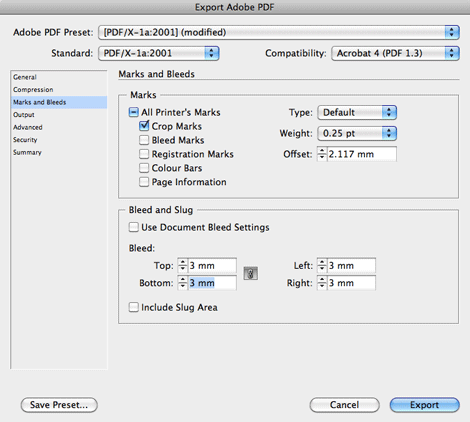
How to add Bleed when exporting to Pdf.
File > Export > "Enter your chosen file name" > Save
An 'Export Adobe Pdf' box will now appear.
Choose ‘PDF/X-1a:2001’from the top 'Adobe PDF Present' menu.
Scroll down to the 'Marks and Bleeds' menu.
Tick 'Crop Marks’.
Add ‘3mm’ into the four Bleed boxes.
Then click ‘Export’ and your file will be saved as a print ready pdf.
What should my finished pdf look like?
Your exported pdf should look like the example here on the right. The crop marks show where we will trim the print and your image is extended 3mm beyond the marks.
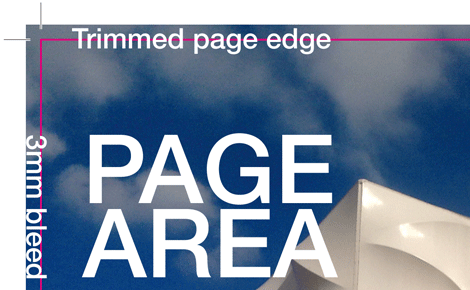
THIS ISN'T BLEED!
Notice the image stops on the crop marks and doesn’t bleed off the page edge.(Check you typed ‘3mm’ into each of the bleed boxes when you exported to pdf). This will still leave you with an unwanted white border around your pages if our trimming isn't up to NASA standard.

File set up recap
1. Make sure your artwork is the same size you would like the printing to be.
2. Check your images are hi res and saved as cmyk rather than rgb.
3. Have you added 3mm bleed on all four edges?
4. Keep important content and page numbers 5mm from the page edge.
5. You need an even number of pages for books and booklets.
6. Your file should have the same number of pages as your final booklet.
We don't just deliver in Colchester
Check out www.exwhyzed.co.uk for
Booklet Printing
Business Card Printing
Leaflet Printing
Poster Printing
Self Published Book Printing
Zine Printing
Contact Us
tel: 01206 766647
email: colchester@exwhyzed.co.uk
web: www.colchesterprinter.com
and www.exwhyzed.co.uk
© Ex Why Zed 2016
All rights reserved. No reproduction without permission -
use some brain cells and write your own content!
Check www.exwhyzed.co.uk for...
Annual Report Printing
Architecture Study Book Printing
Artist Catalogue Printing
Booklet Printing
Business Card Printing
Degree Show Catalogue Printing
Digital Printing
Final Major Project Printing
Leaflet Printing
Newsletter Printing
Portfolio Printing
Poster Printing
Self Published Book Printing
Stationery Printing
Sticker Printing
Zine Printing